Came across the video showing the new product available at CMON shop and intended mostly at making forms for replicating conversion bits. As I often do head- or handswaps in 15mm (and as there is more than one sculpting project I had to put on hold because I didn't want to make ten or so RTV molds for different small bits...), I will definitely give it a go. Just see for yourself:
piątek, 28 stycznia 2011
czwartek, 27 stycznia 2011
Sci-Fi Corridor: Pipes, Tanks etc.
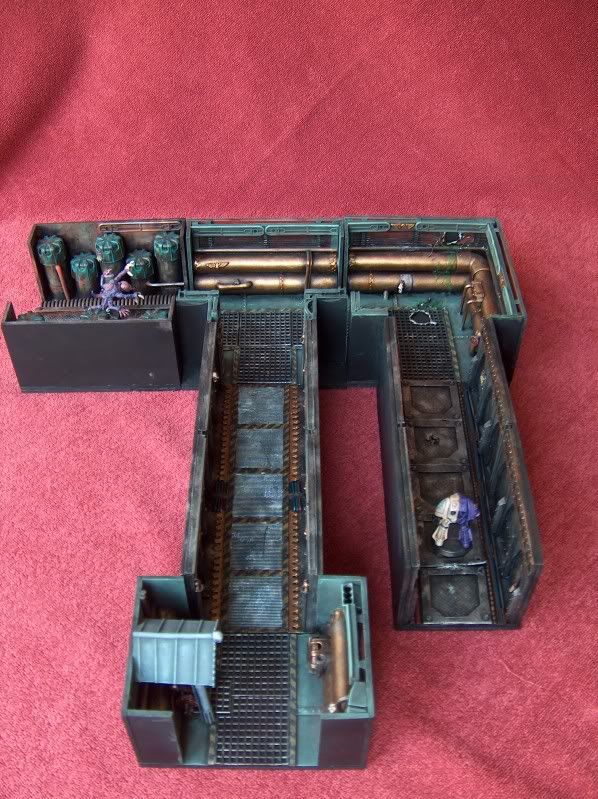
As promised - here's another update on how the work on the corridor pieces progresses. I've painted one of each of the basic elements (except the stairways) and took some pictures of some basic layouts made with them.
Also, as you can see in the pictures, I make an extensive use of Urban Mammoth 'Chemical Plant' kit - the thing is, I had to leave back side of the walls flat, so the pieces could be fitted back-to-back. But hollow walls would look pretty bland - and putting some piping in them seemed to be an obvious way to go...
Also, as you can see in the pictures, I make an extensive use of Urban Mammoth 'Chemical Plant' kit - the thing is, I had to leave back side of the walls flat, so the pieces could be fitted back-to-back. But hollow walls would look pretty bland - and putting some piping in them seemed to be an obvious way to go...
 |
| Five basic pieces: corridor with wall (8x12), corridor with wall (4x8), 8x8 corner A, 8x8 corner B, walkway 4x12 |
 |
| Urban Mammoth chemical plant bulkhead (left) and The Scene vent (right) used for detailing |
 |
| Closer look at one of the corner pieces. The ladders on all pieces are made from H0 scale railings (a box containing 180cm of these can be bought for ~$6 in a model railway store). |
 |
| Details: vents from The Scene, riveted plates made from plasticard (see tutorial) |
 |
| Pipes and drums, haroo, haroo (sorry, couldn't resist) |
 |
| Tanks from chemical plant kit |
 |
| Mutants advance... |
 |
| A female ganger watches the corridor |
 |
| Fight! |
 |
| Sample layout #1 |
 |
| Sample layout #2 |
 |
| Sample layout #3 |
wtorek, 25 stycznia 2011
Sci-Fi Corridor: sample paintjob
I have used the first finished piece to try out a colour scheme I plan to use on my whole Sci-Fi Corridor system - how do you like it?

poniedziałek, 24 stycznia 2011
Sci-Fi Corridor: How do the pieces fit?
Got the package with 1x1 technic bricks so I can show you how the pieces are meant to be connected.
 |
| One 4x12 piece with wall, three 4x12 walkways (before texturing), some friction pins. |
 |
| The above pieces can be arranged like that... |
 |
| ...or that... |
 |
| ...or that... |
 |
| or that. As you can see - I use some pipes and other bits to add some texture inside the holes on the 'flat' side of the walls. |
niedziela, 23 stycznia 2011
Work on the modular corridor system begins...
First things first. When I began planning my modular corridor system, I had to decide what I really wanted there and how the pieces should fit together.
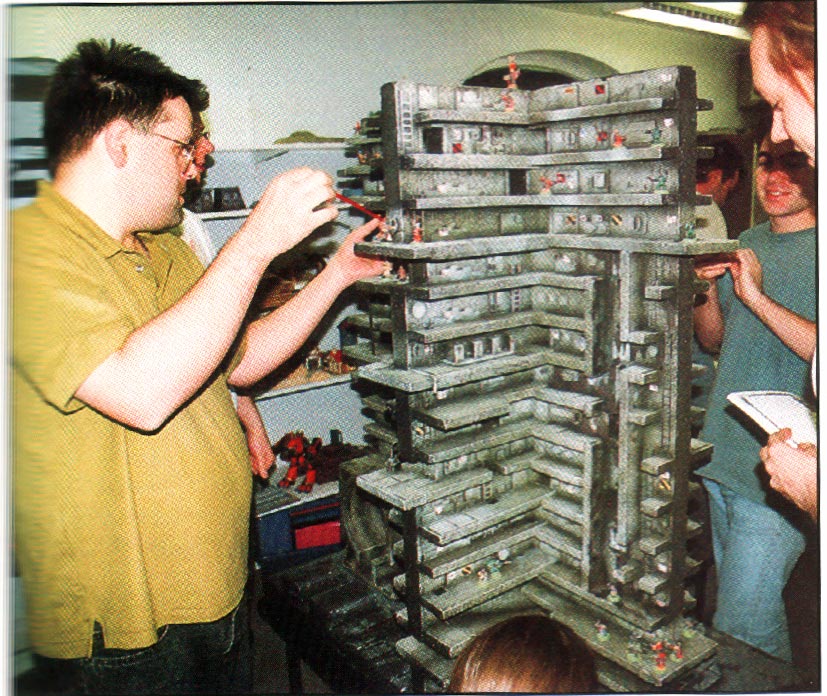
I knew I wanted to be able to make something like those 3D Space Hulk boards that pop up here and there regurarly. Something like this:

But I knew that at some point I will like to get back to Necromunda - therefore more vertical terrain would be welcome. Something like this:


What I came up with? This:
 Not really impressive, is it? Those are the basic, 'skeleton' pieces for the board made out of - well, you're right: LEGOs. I used the Lego Digital Designer for the planning phase, and then ordered all the needed pieces in large lots of from BrickLink - it's a site where one can buy LEGO pieces for like $0.01-$0.05 apiece (rare elements can be more costly, though - but there are none in here, as you can guess). The basic set of pieces, with which I can cover an area of 50x70cm or similar did cost me around $50 - the same price tag as for the Litko space corridor system.
I am still waiting for the most important element: Technic bricks 1x1, which will allow me to connect the above elements side-to-side with the use of 'friction pins' - but I can already start working on texturing the walls and floors (see the picture below).
 But here comes the coolest part - how the elements can be arranged, both side-to-side, and atop of each other:

 And here's something more complicated...

I knew I wanted to be able to make something like those 3D Space Hulk boards that pop up here and there regurarly. Something like this:
But I knew that at some point I will like to get back to Necromunda - therefore more vertical terrain would be welcome. Something like this:
Or this:
What I came up with? This:

I am still waiting for the most important element: Technic bricks 1x1, which will allow me to connect the above elements side-to-side with the use of 'friction pins' - but I can already start working on texturing the walls and floors (see the picture below).


sobota, 22 stycznia 2011
Batman and Bauhaus: some workbench pictures
Real life still getting in the way - but as some of the books I have to read for the exams are available as audiobooks, I have finally managed to spend some time at the workbench. So, without further ado:
 |
| WIP GT Offroad conversion for Bauhaus army - it still needs a gun turret and a partial roof to be put there |
 |
| The Joker, converted from The Scene special agent - he just needs to get his hair and the collar sculpted |
 |
| Belt, logo and eyes (not mentioning the base) still need some touch-ups - but I'm almost there |
środa, 19 stycznia 2011
New version of Gut Check! at Tiny Solitary Soldiers
Spacejacker has uploaded new version of his Gut Check! ruleset - it looks very promising and I'll definitely give it ago after I pick up some Heroscape terrain.
PS Sorry for lack of content in the last few days - exam session is coming and my daily activities are narrowed down to reading more than I could possibly remember. Packages with components I ordered for the S-F corridor (or "corridor", as the tiles will be made in a way that allows them to be arranged both side to side and vertically - hello Necromunda!) are slowly starting to arrive, so I guess I will be able to post first pictures of the tiles next week.
PS Sorry for lack of content in the last few days - exam session is coming and my daily activities are narrowed down to reading more than I could possibly remember. Packages with components I ordered for the S-F corridor (or "corridor", as the tiles will be made in a way that allows them to be arranged both side to side and vertically - hello Necromunda!) are slowly starting to arrive, so I guess I will be able to post first pictures of the tiles next week.
niedziela, 16 stycznia 2011
Tutorial #2: making riveted plates
As I intend to go with a 'down and dirty' look for my Sci-Fi corridor project (think: Aliens, Necromunda, Blade Runner, starships from the old Star Wars trilogy...), there's a couple of details I just have to put in there. Riveted metal plates are surely one of these - but considering the planned size of the project, using blobs of superglue or tiny pieces of plasticard was simply not an option. So here's a method I have discovered for making rivets - I wrote about it once on TMP message boards but I think it's easier to figure it out when you can see the pictures.
Tools and Materials
Tools
Steel ruler
Hobby knife
Needle
Marker pen
Materials
Plastic canvas ('granny grating')
Thin plasticard (0.5mm thick)
Take a piece of granny grating and - using the holes as a guideline - draw the shape of the plate on it with a marker pen. If you want to have less rivets on your metal plate (for example: just four per plate, one in each corner), you may want to mark only some of the holes.

Place the marked piece of granny grating over a sheet of plasticard and go through each of the holes with a needle - don't push too hard, you don't want to make a hole. It may take a few attempts to figure out how to do it.
Use a hobby knife to cut your riveted plate from the plasticard sheet. As you can see, the same template was used a couple of times, producing plates of equal number and spacing of rivets.
 The plates are ready to be put on your model and painted - see examples below.
Tools and Materials
Tools
Steel ruler
Hobby knife
Needle
Marker pen
Materials
Plastic canvas ('granny grating')
Thin plasticard (0.5mm thick)
Take a piece of granny grating and - using the holes as a guideline - draw the shape of the plate on it with a marker pen. If you want to have less rivets on your metal plate (for example: just four per plate, one in each corner), you may want to mark only some of the holes.

Place the marked piece of granny grating over a sheet of plasticard and go through each of the holes with a needle - don't push too hard, you don't want to make a hole. It may take a few attempts to figure out how to do it.
 |
| I use an unraveling tool with a handle as it is more comfortable - but the same results can be achieved with a sewing needle. |

 |
| These were painted using brown undercoat and then drybrushed with Mithril Silver. Devlan Mud wash was then applied to further bring out the rivets. |
 |
| Riveted plates made with a slightly thicker, blunt needle (the model is an Space Ork spider mecha I'm working on) |
 |
| Riveted plate on a wall of a shanty town shack |
piątek, 14 stycznia 2011
New options for Capitol from Micropanzer Wargame Studio
Remember a Purple Shark for the Capitol Army?
 Micropanzer Wargame Studio announced a model being a perfect match for the original - with one single exception: it's not as ugly :)
(thanks to Miniature Review for posting the link)

(thanks to Miniature Review for posting the link)
czwartek, 13 stycznia 2011
Progress on 15mm Etoiles Mortant
Just to give you an idea of what looks I have in mind for my upcoming Etoiles Mortant - a quick update on where I am with the conversion work.
In case you didn't come across WarZone or Mutant Chronicles - the Etoiles Mortant ('Dying Stars') is an all-female unit in the army of Bauhaus corporation. They are primarily close-assault unit, wielding swords and pistols, with support options limited to weapons such as light flamethrower or some grenades.
Here's how the original 28mm Etoiles Mortant look:

I decided there are three features of the original look that I would like to add: combat boots (the idea of jumpsuit merged with the boots didn't really appeal to me), belt and webbing (to break up the looks of the jumpsuit a bit) and - of course - the swords.
At first I thought I will just use katana-wielding hands from Rebel Mini ninja pack - but when the order arrived it became clear that it's really not an option. Those hands were much too big - I needed BIG and a bit cartoony swords (see the original look...) but small, delicate hands. What's more - I knew that handswaps (and sculpting swords, for that matter) was something I really hated about doing conversions in 15mm.
So what did I do?
And to give you a sneak-peek on what's next about these ladies - here's a picture of original Valerie Duval, Etoiles Mortant hero model:

In case you didn't come across WarZone or Mutant Chronicles - the Etoiles Mortant ('Dying Stars') is an all-female unit in the army of Bauhaus corporation. They are primarily close-assault unit, wielding swords and pistols, with support options limited to weapons such as light flamethrower or some grenades.
Here's how the original 28mm Etoiles Mortant look:

I use Black Widow Mercs as a base for my conversions - as you can see below, they resemble the original look at some points (jumpsuit, pistol, hairstyle, shoulder pads...):
 |
| Black Widow Mercs as they come in a pack (there are 3 poses in jumpsuits and 3 more, wearing longcoats) |
At first I thought I will just use katana-wielding hands from Rebel Mini ninja pack - but when the order arrived it became clear that it's really not an option. Those hands were much too big - I needed BIG and a bit cartoony swords (see the original look...) but small, delicate hands. What's more - I knew that handswaps (and sculpting swords, for that matter) was something I really hated about doing conversions in 15mm.
So what did I do?
 |
| Cut off one of the pistols. |
 |
| Using needle, made a hole in each hand that was about to get a sword and pushed a thin wire through it |
 |
| Glued thin strips of plasticard on both sides of the wire. A putty was then used for hilts and to fill the gap between two layers of plasticard. |

And here...
 |
| Does that model from Rebel Minis superhero pack look familiar? Hmm... |
wtorek, 11 stycznia 2011
Rebel Miniatures Superhero pack and Black Widow Mercs
A package from Rebel Miniatures arrived in my mail today. Got 3 packs of their new superhero set, 2 packs of Black Widow Mercs and 1 pack of ninjas. The ninjas have been around for quite a while, but I guess some of you may want to hear a word or two about the new packs.
The superhero set contains eleven figures, as seen here. There isn't much detail which would go unnoticed while looking at the picture from the Rebel Mini site - one exception being that the miniature on the far right isn't actually holding a gun, but its hand IS a gun.
The miniatures are consistent in size and style - with the only exceptions being a) the Magneto type (first row, second one from the right), being visibly larger not only in comparison with other minis from the pack, but from other lines as well; and b) the 'not-Iron Man', being reasonably smaller.
Sculpting-wise, these are one of the best 15mm minis I have seen - the details are really crisp (the muscles look superb!) and should be really easy to paint, especially using inks/washes. What's more, these miniatures - while anatomically correct - seem really delicate (filigree, I'd say) with their thin limbs and dynamic poses, nothing like those big chunks of white metal one can see while getting through some older 15mm lines on the market. I'd say that style-wise these remind me of the Road Warriors or Heroes of the Sepulvedan Resistance sets from Khurasan.
There is little to no flash and mould lines are almost invisible - but that's a standard one can expect from Rebel Minis if he has seen any of their other products.
Here you can see some size comparisons with GZG, Khurasan and Eureka:
The above remarks also apply to the Black Widow Mercs set - but I'd say the casting is not as great here. The shoulder pads (worn by the ones without coats) and the face details seem a bit flat while compared to the superhero set - but these are still very nice miniatures, getting a B+ instead of A more because of the high standard set by the other pack than because of anything else.
Last but not least - I told you that I'm going to start working on some Batman miniatures when I get my hands on those Rebel superheroes. So here it is - a first pic of my 15mm Batman (he needs some corrections on the cape and nose, spikes added to the gloves - but I'm happy with the overall look):

The superhero set contains eleven figures, as seen here. There isn't much detail which would go unnoticed while looking at the picture from the Rebel Mini site - one exception being that the miniature on the far right isn't actually holding a gun, but its hand IS a gun.
The miniatures are consistent in size and style - with the only exceptions being a) the Magneto type (first row, second one from the right), being visibly larger not only in comparison with other minis from the pack, but from other lines as well; and b) the 'not-Iron Man', being reasonably smaller.
Sculpting-wise, these are one of the best 15mm minis I have seen - the details are really crisp (the muscles look superb!) and should be really easy to paint, especially using inks/washes. What's more, these miniatures - while anatomically correct - seem really delicate (filigree, I'd say) with their thin limbs and dynamic poses, nothing like those big chunks of white metal one can see while getting through some older 15mm lines on the market. I'd say that style-wise these remind me of the Road Warriors or Heroes of the Sepulvedan Resistance sets from Khurasan.
There is little to no flash and mould lines are almost invisible - but that's a standard one can expect from Rebel Minis if he has seen any of their other products.
Here you can see some size comparisons with GZG, Khurasan and Eureka:
 |
| Khurasan Road Warrior, two Rebel Mini superheroes, GZG Ravager, Rebel Mini superhero, Eureka Sci-Fi German |
 | |||
| Khurasan Road Warrior, two Rebel Mini superheroes, GZG Ravager, Rebel Mini superhero, Eureka Sci-Fi German |
 |
| Khurasan Road Warrior, two Rebel Mini Black Widows, GZG Ravager, Rebel Mini Black Widow, Eureka Sci-Fi German |

poniedziałek, 10 stycznia 2011
FOCUS! - first look at the rules
 |
| Father Thadeus von Edelreizker and Anton Matierewitsch Bukolov, Kislevite witch hunter, fight some undead on the streets of Mordheim |
Not too much eye-candy this time - haven't had time to paint since saturday and my order from Rebel Minis haven't arrived yet, either. So, a quick glimpse on the rules I'm working on.
These are intended for 'cinematic' type skirmishes, with quick changes in situation on the battlefield and a crucial role played by the hero characters. The following two paragraphs show how the models are activated (just a quick note: those rules use a d10 die for all the tests with stats given in X+ form, that is, you have to roll X or higher to pass; the average movement rate is 4" per action; the average Aptitude is 7+ - 8+ for a grunt, 5+ for a hero)
I. ISSUING ORDERS
Players alternately issue one order at a time, choosing from the list below.
- Take an action with a character in a focus zone
- Place a focal point token
- Place a preparations token
- Move the focal point token anywhere on the battlefield
II. TAKING ACTIONS
Models within 3” from any focal point (and any models base-to-base contact with them) count as being in a focus zone. A player can take a single action with any character in any focus zone.
If there is a model with a Leader feat in the same focus zone, up to two models can take actions before the player passes to the opponent. Actions of the first model have to be completed before passing to the second one.
Any model may attempt to take a last-ditch effort, ‘squeezing in’ another action(s) after the first. To do so, the model has to pass an Aptitude test. If it passes, it can take another action. If it fails, the model is caught flat-footed (see below).
The following modifiers are applied to Aptitude:
For each action already taken by passing an Aptitude test: +1 |
Within enemy zone of focus: +1 |
Outnumbered (more enemy models in the same zone of focus than friendly ones): +2 |
If a model fails its Aptitude test and is caught flat-footed, a single enemy model within the same zone of focus (or in base-to-base contact with the flat-footed model) gets to take an action. Regardless of whether opponent decided to take the action or not, the play passes to him.
sobota, 8 stycznia 2011
Sci-Fi Corridor Tutorial #1: Stairways
As I mentioned before, one of my main projects for 2011 will be making a modular Sci-Fi corridor for Space Hulk-style games. I have a soft spot for heavily detailed terrain - and as much as different bits from Urban Mammoth, GZG and The Scene could help me with detailing the walls, a single problem remained: stairways.
So, without a further ado, here's my take on making 15mm industrial/spaceship stairways - but you can easily use this technique to make some stairs for fantasy/medieval gaming (just use wood-textured plasticard or pieces of balsa wood for the steps).
The stairway I'm going to make is going to be 2cm high, 2cm deep and 4cm wide - but you can adjust these measurements to your own projects.
Tools and materials
Tools:
Hobby knife
Steel ruler
A pair of zig-zag pattern craft scissors (you can find these in art&craft store) like these:

 Materials
0,25mm plasticard
Medium-thickness cardboard
Balsa or pine wood
Some textured plasticard or 'granny grating' (plastic canvas used in needlework)
Superglue
Part 1: Stringers
Cut four squares of equal dimensions (mine were 2x2 cm) out of plasticard, two for each of the stringers.
 Cut two squares out of the cardboard (using the same dimensions as with plasticard ones).

Using your craft scissors, cut diagonally through each of your prepared squares (see the picture).

Glue a plasticard stringer on each side of the cardboard one, sandwich-style:
 Cut a piece of balsa or pine wood, roughly 1 cm long and glue it between the stringers (see below). Notice that I used 2cm wide wood, so the edges where the stringers will be glued on are even and won't need any sanding:

 Part 2: The treads
Cut strips (each measuring 40x5mm) out of textured plasticard or granny grating:
 Using superglue, glue the strips to the stringers (tip: put a drop of superglue in the corners, so to make sure each tread is glued to the stringer both vertically and horizontally):


Finished stairway
I painted the stairway by undercoating it with black and then drybrushing it with silver. Some black wash was added in the places that appeared too bright for me.

That's it for today, I hope you will find the above technique useful.
So, without a further ado, here's my take on making 15mm industrial/spaceship stairways - but you can easily use this technique to make some stairs for fantasy/medieval gaming (just use wood-textured plasticard or pieces of balsa wood for the steps).
The stairway I'm going to make is going to be 2cm high, 2cm deep and 4cm wide - but you can adjust these measurements to your own projects.
Tools and materials
Tools:
Hobby knife
Steel ruler
A pair of zig-zag pattern craft scissors (you can find these in art&craft store) like these:


0,25mm plasticard
Medium-thickness cardboard
Balsa or pine wood
Some textured plasticard or 'granny grating' (plastic canvas used in needlework)
Superglue
Part 1: Stringers
Cut four squares of equal dimensions (mine were 2x2 cm) out of plasticard, two for each of the stringers.


Using your craft scissors, cut diagonally through each of your prepared squares (see the picture).

 |
| Four plasticard stringers |
Glue a plasticard stringer on each side of the cardboard one, sandwich-style:


Cut strips (each measuring 40x5mm) out of textured plasticard or granny grating:


Finished stairway
I painted the stairway by undercoating it with black and then drybrushing it with silver. Some black wash was added in the places that appeared too bright for me.

 |
| As you can see, the treads can held a miniature base between them |
Subskrybuj:
Posty (Atom)