wtorek, 31 lipca 2012

Modular Urban Board - first tile painted

The modular urban board that I have shown you yesterday may not look like much when unpainted - but today I painted the first street piece and I'm quite happy with how it turned out. See below:
The tile itself.
Marines patrolling the deserted city. Miniatures from Rebel Minis.


poniedziałek, 30 lipca 2012

Modular Urban Board Preview

Inspired by the really impressive ShadowRun 15mm board on Clear Horizon, I've decided to start my own modular urban board. The pieces are 20x20cm squares, and the first 'set' roughly corresponds to what one can find in Miniature Scenery City Grounds set.
Below you can see an example of 4x4 layout - I've done the basic work on the streets (acrylic filler was used to hide the wood texture) and started gluing homemade plasticard sidewalks down.
(Click the pictures to see the bigger versions)

Some detail shots:

I plan to airbrush the board using going from light gray through ivory to white. The streets will be sprayed black and the raised platforms will get some stencil markings with dark green.

środa, 25 lipca 2012

Another 15mm WarZone unit

With some really nice not-Mutant Chronicles 15mm miniatures coming soon from Trench 2114, I got back to painting my own 15mm WarZone armies, finishing a second Ducal Militia unit. At the moment I have finished two 6-men squads of Ducal Militia (I keep to 6-men count as I want to use these minis with GruntZ rules too) - a squad of Etoiles Mortant, a GT Offroad buggy and a Blitzer Kapitan (a commander for my GruntZ force) still wait for their turn.
(Click on the pictures to see the bigger versions)
A new Ducal Militia squad.

Two squads side by side.

Some of the details.

czwartek, 19 lipca 2012

More 15mm characters: Warhammer, Star Wars, LotR

Here's another batch of miniatures that I have started to work on a loooong time ago but finished only lately as I'm trying to clean up my painting workshop a bit. As always you can click the picture to see the bigger version.
Warrior Priest of Sigmar for my 15mm Warmaster Empire army (own sculpt)
Another view of the Warrior Priest
Twi'lek dancer for Star Wars. Lekku (head tails) made from ProCreate were added to a Rebel Mini miniature from their 5150 Aliens Pack.
Legolas. Another simple conversion based on a Splintered Light Miniatures Elf.

Three members of the Fellowship rush into battle.

środa, 18 lipca 2012

Jaime Lannister/Bretonnian Hero

Summer holidays finally came and I was able to do some painting. So here's the first of a couple of miniatures that I've completed lately: a knight from Corvus Belli 100 Years War range, painted up as Jaime Lannister from "Song of Ice and Fire" and meant to be used as a hero in my Warmaster 15mm Bretonnian army.

piątek, 4 maja 2012

More 15mm Star Wars!

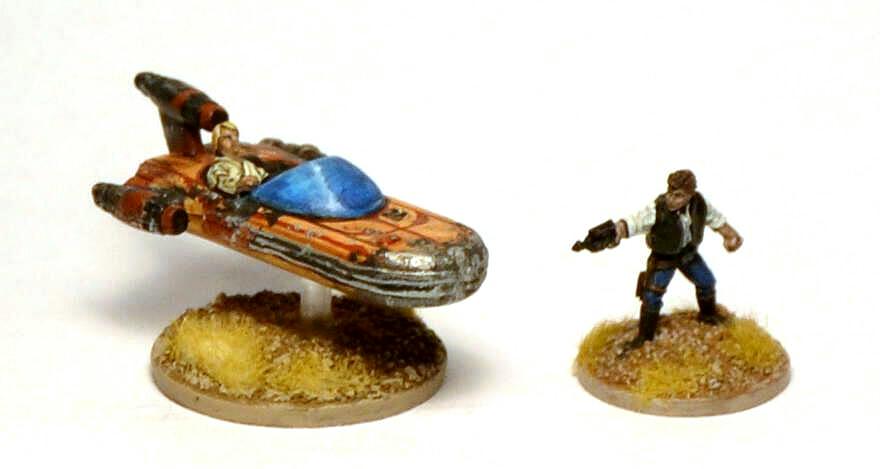
I've decided to celebrate the Star Wars Day 2012 by painting a SW miniature I had bought some time ago on eBay. It's a T-34 Landspeeder with Luke Skywalker as a driver - the mini is a soft plastic one, it comes from one of the SW Micro Machines sets.
Click to see the bigger version
Landspeeder next to my Mal-Reynolds-to-Han-Solo conversion

piątek, 27 kwietnia 2012

Painting the city tiles - tutorial

The response to the last post on the Mordheim/ruined city tiles project was enormously positive - thanks! Some of you have requested a tutorial for painting the tiles and well - here it is.
This is how the board looks like before painting. I wanted to finish the previous spray can, that's were the brown spots are from.
After gluing the pieces together but before the undercoat, I put a fair amount of Vallejo Sand Paste on the tiles. This allows me to mask some of the places were castings don't fit too well or where the lines between them form too regular pattern.
 I use Idea acrylic spray (Burnt Umber) for the basecoat. The whole board is covered in a series of short bursts to keep the paint layer thin and not obscure the details.
That's how a basecoated tile looks like. Still a long way to go.
I decided to use the following Vallejo Model Color paints for my table: German Camo Beige, Dark Sand, Pale Sand and Ivory. Why use the model paints while there is a selection of cheap craft paints available? Simple: the craft paints that I know of rarely (or never) have a selection of tones as wide as VMC - so you have to mix. I want my board to have a consistent look and keeping the mixing proportions right is just a pain in the ass... and you still won't need more than about $8-10 worth of these paints for a 90x90 cm board.
For applying the paint I use a kitchen sponge cut into several small pieces. This prevents the paint from going into the recesses and allows me to add an interesting 'stone' texture which wouldn't be achievable with a brush.
Take a tiny amount of paint on the sponge...
...dab a bit of it away...
...and apply irregularly on the board.
Try to change the side of the sponge you use, change the sponge piece you use from time to time and the strenght with which you press the sponge against the board.
Repeat the process for every tone you have selected.
That's how the board should look like in the middle of the process. If you get 'lines' like the one seen in the picture above, don't panic: just dab some paint around them to form a more irregular shape.
The second board along with the first - everything fits quite nicely.
After the paint dries, I apply tiny blobs of PVA glue and static grass on the board - especially in the places where I need to break up the regularity of the tile patern or where I need to mask the spaces between the castings.
If you applied too much paint in some of the areas, use watered-down GW Devlan Mud wash: it will add a new tone to the board and make the recesses between the tiles visible when you messed them up.
The board is (almost) finished. I still have to paint the basement and finish the buildings - but it's a material for a different post.